Finding the right Theme

Lately I’ve been going through Blog Themes like a bar of chocolate. I just can’t decide which is the right fit for me.
I want to showcase my Pictures (even though I still need to learn alot about taking food related ones) but on the other hand I want a simple, clean layout.
It is soo hard. I wish I would have time to finally get around to finishing my website and finding a good provider to upload it.
How did you decide on a layout?
Goodness there are so many choices. I think I’m probably gonna change around a little more until I am really happy.
So far the one I liked best was the “Chunk” Theme but the huge whitespace on top botherd me.
My mind is everywhere today. My shoulder is bothering me again…. my boss is not paying me… its snowing. Sooo much on my mind.
I wish there would be a switch that you can just turn and everything is “Happy go Lucky”… but well that would be to easy.
and when I think about that in 2 Days is my Birthday already…I don’t even wanna celebrate it. One year older….
One more year with a feeling I have achieved nothing in my life so far.

Well…. I gotta keep my head up and look forward. I am still alive and that’s the most important part.

Chocolate Vanilla Chocolate Cake – Goodbye Dr.Dr. Wolf Cake

What a sad sad day. This Thursday one of the best teachers on my school retired. We only had him for about 1 1/2 years but he is one of those teachers, you just need to listen and you understand everything right away. He taught Computer Science and Engineering. We learned all about designing a Website, about Server, XML and all that kinda stuff. He was one of those teachers you’re always gonna remember. But after 40 years of getting stressed out by us annoying students, he went into his well deserved Retirement. He is gonna be missed and we are all kinda anxious to see who is gonna be our replacement for him. That Teacher sure is gonna have a darn hard time with us.

So Wednesday was our very last lesson with him, but we knew we would see him one more time the next day since he went on a Excursion with us to Jena. Jena is probably best known for ZEISS. The Optical Lens Manufacturer. Lenses of them are for example in the Hubble Telescope. Well I am getting off topic here ^^
So anyways he went to the Optical Museum and the Planetarium with us. One of my classmates works at the Planetarium so we got to see an extra show and had time to really say goodbye to him. He was very touched especially about our cake.

That Cake…. The decision to make one fell at about 3pm Wednesday afternoon, which means I had about 12 Hours to finish this whole thing. It took me until about 11pm and I was quite happy how it turned out for being such a short notice cake.

<img src="” width=”352″ height=”500″ alt=”Happy-Caking-057″>

To make things easy I decided to go with a Cake Mix. I choose Most Surpreme Vanilla Cake with Pudding in the Mix from Pillsbury. To add a little fancy to the simple I mixed the batter according to directions and then split it in 1/3 and 2/3. To the leftover 1/3 I added one more egg, 2TBS Oil, amd about half a cup of flour to make a sweet Chocolate layer.

Happy-Caking-018

This looks delicious by itself. Especially right out of the oven. Let it cool on a cooling rack.

Happy-Caking-015

In the next picture is the second half of my split Vanilla Cake layer. But what I really want to show you is the thing it sits on. It’s a cake divider.
You put it around the cake just like you would with a cake ring but it has an opening every centimeter that you can cut into with the sharp knife it comes with to split your cake in 8 even layers. I used the Wilton Cake Divider thing before but my cakes would always come out uneven. This thing though makes live and cake dividing so much easier.
I am trying to add a link but somehow it is not working. Don’t know why. Just google “ZENKER KUCHENSCHNEIDHILFE” at Amazon.
Love it.
Happy-Caking-019

To make the cake less plain I added a layer of Homemade Wildberry Jam to it.
Happy-Caking-027

and on top of that, a layer of Vanilla Pie Filling.
Happy-Caking-029

Do this with all the layers. Cake – Berry Jam – Pie Filling.
Happy-Caking-030

and then start assembling. I had 3 layers so I started with a Vanilla Cake Layer, then a Chocolat Layer and then another Vanilla Cake layer.
On the very top layer, do not add the pudding. Just leave the berry jam layer.
Happy-Caking-031

When you are done with this your very top should be berry jam !!!!

Next take some yummy milk chocolate
Happy-Caking-017

Put in a double boiler and melt until its nice and shiny. Make sure the water underneath never boils or it will ruin your chocolat.
Happy-Caking-033

Take a deep baking sheet and line with parchment paper. Put a cooling rack on top and put your layered cake on top of that.
Happy-Caking-034

take your melted chocolate and let run smoothly across the whole cake. Help spreading it with a spatula, careful to get chocolat all over the top and sides.
Happy-Caking-037

Happy-Caking-036

After this was done, I let it sit to cool in a cold room until the chocolate is solid again.

While everything was cooling down. I started to make the little decorations for the top of the cake.
A Table made out of a chocolate bar turned upside down with cookie wafer sticks cut in half and attached with a little melted chocolate as tablelegs.
A computerscreen, keyboard, mouse and diploma made out of Fondant added with CMC and white fondant tiles that I painted Black to make a checkerboard look.

Happy-Caking-048

Happy-Caking-045

Happy-Caking-052

Happy-Caking-047

Enjoy

Happy-Caking-057

Oreo Cookie melted Snowman Cookieballs

I love the Winter. Not because of the snow, mostly because whenever it is Winter I know my birthday is coming around soon.
In my part of Germany we didn’t have a single day of snow so far. So I thought, why not make something according to the sad
mood out there. I wanted something to cheer me up and the Snowman Cookieballs where born.

What you need

1/2 Pkg. (4oz.) Philadelphia Cream Cheese, softened
1 Pkg. Jell-O Chocolat Instant Pudding
1/2 Cup Cold Milk
36 Oreo Cookies, finely crushed (about 3 Cups)
1 Pkg Mini Oreos
1Pkg White Candy Melts
Edible Food Writer (I use Americolors but every bigger GroceryStore should have some in the baking isle)

Ingredients

Since we don’t have most of the ingredients called for I had to adapt. I used Mascarpone instead of CreamCheese which is almost the same texture, well the Oreos we do have for a couple of months now, which is fantastic =) and since we don’t have non-cook Jello I had to use real pudding but it worked just fine and since we don’t have CandyMelts I just used regular baking chocolate.

How to do it

1.
Beat pudding mix and milk in medium bowl with whisk for 2 minutes.

2. Add cookie crumbs and cream cheese and mix well.

3.
Shape into 42 (1 inch) Balls and line up neatly on parchment paper lined baking sheet.

Oreo Cookie Cakeballs

4. Freeze for 20-30 minutes.

5. Melt the white candymelts.
Chocolate

6. Retrieve your frozen Cookieballs. Spoon the melted chocolat over the top of the cookie balls, so it runs down and forms a puddle underneath. This really doesn’t have to be perfect since afterall our snowman are melted ^^ while still wet, add a Oreo Cookie as hat for our Snowman.

Oreo Coookie Cakeball Snowmanns

7. Let the chocolate harden completely. Use your Edible Food Writers and draw one some silly faces.

Oreo Coookie Cakeball Snowmanns

Voilà, funny melted Snowman Cookieballs.

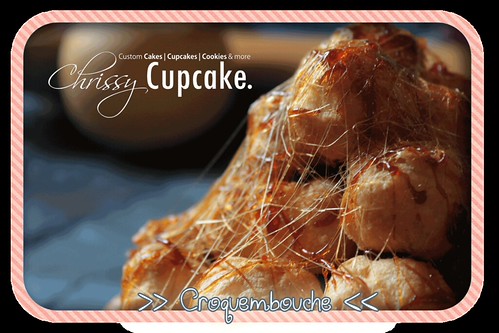
Croquembouche

My Grandma has this bakingbook since I am really small. From time to time I would steal it and take it home with me to look at it. I just loved this book.
Big glossy pictures, amazing recipes. One picture and recipe amazed me the most of all of them, the Croquembouche recipe.

Croquembouche

Croquembouche (french for “Croque en bouche = crunch in the mouth”)is a big tower made of cream puffs that are dipped in Caramel and stacked as high as you can go.
It looks absolutely spectacular and it always amazed me but I never even thought about trying this, since it looked so complicated. Let me tell you right now, it is the easiest thing in the world and your guest will think it took you hours in the kitchen.
There are 2 ways to do it. The easy “I’m gonna do it semi-homemade” way or the “I’m gonna do it all by myself” completely homemade -way.

I choose Way Nr. 1 since I didn’t have a whole lot of time when I tried this.

What you need:

as many Cream Puffs as you want. The more the higher the tower, the fancier it looks
1 Cup Brown Sugar
1 TS Water
1 ready made Piecrust

How to do it

1. Bake the Pie Crust according to directions, but cut off the side so you just have the flat bottom part.

2.
Take a good nonstick pan, add the brown sugar and and the tablespoon of water.
Heat over medium heat and constantly stir until the sugar is dissolved and get a rich golden color.
If you want a richer nuttier, caramel flavour, keep the sugar over the heat until it gets a deep dark brown.
Make sure not to burn it and especially not to burn yourself.

Caramel

3. Take the flat pie crust and spoon caramel on top of it. Start stacking the cream puffs, start from the middle outwards until the whole bottom is covered. Make sure the creampuffs are all sitting in a little bit of caramel to make the tower stable.

Croquembouche

4. For the second level take one cream puff at a time and dip in the caramel, careful not to burn your fingers (the caramel is still freakishly hot) and stack on top of your first level.

5. Continue until all of your creampuffs are gone.

6. When you are at your very top level. Take a fork and pull the rest of the caramel out of your pan or pot and over the top of your Croquembouche, making it look like a spiderweb. By that time it should easily be pulled in long strings with your fork.


Voilá you just made your very first Croquembouche!


Croquembouche

Croquembouche

Rainbow Cake in a Jar

Lately I have been feeling down quiet a bit. Work is stressful and most of the time I don’t get home before 8 or 9 and it is just draining. Twelve hour days, with not even enough time to sit down and have a short enjoyable lunch. So yesterday I just wanted something sweet, something that makes me happy and something that I could take with me to enjoy when I found a nice place to sit down and relax. So what is better than cake even better rainbow with it’s bright happy mood to it and best of all it’s in a jar.

Rainbow Cake in a Jar

1 box white cake mix made according to package instructions
Neon food coloring in pink, yellow, green, turquoise, and purple
3 one-pint canning jars
1 can vanilla frosting
Rainbow sprinkles
Preheat oven to 350 degrees. Thoroughly wash and dry the inside of each canning jar. Spray the inside of each jar thoroughly with nonstick cooking spray. Set aside.

Scoop about 1/2 cups of cake batter into five small bowls. It doesn’t have to be perfect, don’t panic if you get a little more of less of one color than another. Tint each bowl of cake batter with the food coloring until very vibrant.

Spoon about 3 tablespoons of the purple batter into the bottom of each jar. Spoon equal amounts of turquoise batter, then green, yellow, and pink. Place the jars in a shallow baking dish, add about 1/4″ in water in the baking dish. Place the baking dish in the oven and bake for 30-35 minutes.

Remove jars and allow to cool completely before scooping a small portion from the top of your cake and adding a hefty dollop of vanilla buttercream to the top. Sprinkle & serve, or cover with a lid and store in the fridge or pop into the mail & surprise someone you Love or just take a blanket, grab a great book, go out and enjoy some Me-time!

20120111-212608.jpg

My newest acquisitions =)

This weekend my tiny village had a whole weekend festival with a Flea market and concert on Saturday and bakesale and concert on Sunday all to save our church. Everyone could bring stuff they don’t need anymore and it would be sold at the flea market and the revenue from the whole weekend would all go towards the church. Right now we have about 50000 Euro but we need another 233000Euro to buy a new Bell and restore the rest of our beautiful little church. It’s the oldest church in all of Thuringia.

Since I am in the Woman’s Society I helped organizing and when there was a little time left I went to look around the flea market. There I saw this absolutely gorgeous old market scale which I really really loved at first sight. I thought its gonna be much to expensive for me so I didn’t even bother asking. I just bought a cute little Polka dotted Teapot and a fitting polka dot milk can.

20110617-070141.jpg

20110617-070023.jpg

Since they hadn’t sold everything on Saturday they decided to make it a Bakesale / Flea Market on Sunday.

I was one of the ones responsible for the BakeSale. It was great, we had about 16 sheetcakes with about 25 slices each and we sold out completely. We made nice little plates with 6 slices of different cake on each.

After all of this there was time for me to take one more look around the fleamarket and there she was… still sitting there, the big huge market scale. I just knew that moment I really had to have it, so I went over and asked how much it would be.

The guy looks at me, and says “how much would you give?” I didnt really expect that questions and since I wasn’t carrying anymore then 10 €uro and about 30Dollars with me I said “how about 10 €uro!?” He goes “Allright we got a deal”. Omg you can not believe how excited I was. I was about to make a happy dance when I decided I rather do not do this =)

Anyways, I am now the proud owner of a 1946 fully functioning Market Scale. Yeahhh.

Baked Apples with Marshmallows and Caramel Sauce

You know Christmas is long gone, but while I was looking throught pictures I found one of my very favourite christmas things. Baked Apples with  Caramel / Vanilla Sauce.

tasty Goodness

My Mum used to make them whenever we would come in after a day outside in the snow playing and riding our sleds. So even though it is May already I though I share this recipe with you, cause it is always nice to have something that makes you feel cosy and warm from the inside, and this recipe is just that.

I gave this recipe a new spin and added caramel as well as vanilla sauce and some marshmallows on top and made it really easy, fast and simple… But see for yourself…

in the oven

doesn’t this look delicious? I say, happy baking…

Baked Apples with Marshmallows and Caramel Sauce

  • 4 large good baking apples, such as Rome Beauty, Golden Delicious, or Jonagold
  • 1 can of Betty Crocker Coconut Pecan Frosting
  • 1 teaspoon cinnamon
  • 1/4 cup raisins
  • Mini Marshmallows (as much as you like about 1 1/2 cup)
  • 1 Cup nuts (which ever you like best, I used hazelnuts)
  • 1 Tbsp butter
  • 3/4 cup boiling water

How to do it… after the break =)

Yummy Marshmallows

How to >>

  1. Wash the apples and core them. Don’t slice them in half, just cut out the core from the top to the bottom.
  2. Prepare a large baking dish and assort the cored apples in it.
  3. Mix the Pecan Frosting, Cinnamon and Raisins and stuff them in the apple holes.
  4. Top with some nuts and the marshmallows and put in the oven.

Bake at 400 Degrees until the apples are soft and the marshmallows nice and brown. Prepare some Jello Vanilla Sauce and enjoy.

Back after 3 Months of being in the Hospital

I was so very excited to get the Gastric Band Surgery. Everything went well for about a week, until I got the worst and all possible complications. I`m still not all well and I`m still in pain for most but at least I`m back home.

In all I had 3 Operations as well as a blood transfusion twice. It is a great feeling to wake up and hear from the Doctors that you allmost died. This was especially hard on my Mum since I was on Intensiv Care for over 5 weeks and didn’t really realise all the things that were happening around me.

I’m still in a pretty bad shape but I am so happy to be home and I even had the wish of baking some delicious pumpkin pie, which I did for Christmas.

More about the Pie in my next post.

ChrissyCupcake

Introduction… all over again

I have the feeling I basically messed up my very first Blog post, so I’m just gonna start all over again.

Hi everyone, my name is Chrissy, Chrissy Cupcake.

I’m a 21 year old German native, who currently lives back in Germany after living two years in the U.S. of A. I lived in Fairfax, VA very close to Washington D.C. for most of my time over there.I miss every minute of beeing there and I say that when I just got back from a 5 Week trip this last Wednesday. It is strange not beeing where your heart wants to be but I’m sure most people know this feeling or get to know that feeling in some point in there lives.

I know I should Germany cause it is the Country I grew up in, I fell in love for the first time, but there is so many things that made my life terrible. You know there is always this one person in school everyone is hating on? You hate him/her just because everybody else does!? You know what I mean. I was this person in all the schools I went to. I was fat and not that good looking so I was the designated one everyone could treat badly. When I would walk through the halls I would be called “refrigerator” and that’s one of the nicer words. It made me not wanting to go to School at all. I was scared and I would walk different, longer ways just to avoid certain people. But all of this is History now.

The two years in the USA changed my life and changed my personality so much, I couldn’t have asked for anything better happening to me.  I’m confident, I don’t try to hide every place I go. And this coming Tuesday is going to happen the biggest change of all and the reason why I started this blog. I’m going to have surgery to get a gastric band. I’m sooo excited. Weird saying I’m excited for a surgery but this is going to be such a huge change in my life and I am just soo happy about it.

“Perfer et obdura; dolor hic tibi proderit olim”

“Be patient and tough; someday this pain will be useful to you,”

This saying mean so much to me and I just read it a couple days ago in a Book but it has so much power and truth in it, I know this is going to help me on my hard way to become thin and healthy and still enjoying food as much as I do now.

I always loved to cook and bake and my passion grew even larger when I saw all those amazing cake decorators like Buddy Valastro from Cake Boss or all the people on WEtv’s Amazing Wedding Cakes Show. I wanted to know how to work with Fondant and Buttercream an all that kind of stuff so I looked into where I could take classes. I ended up doing all the Wilton Cake Decorating Classes at the local Michaels Store as well as teaching myself with Online Courses and Videos.

I’m going to tell you much more about myself, during my long way of finding myself and finding my way into my new life.

Love, Life, Cupcakes and Weight Loss … that’s what it’s all about.